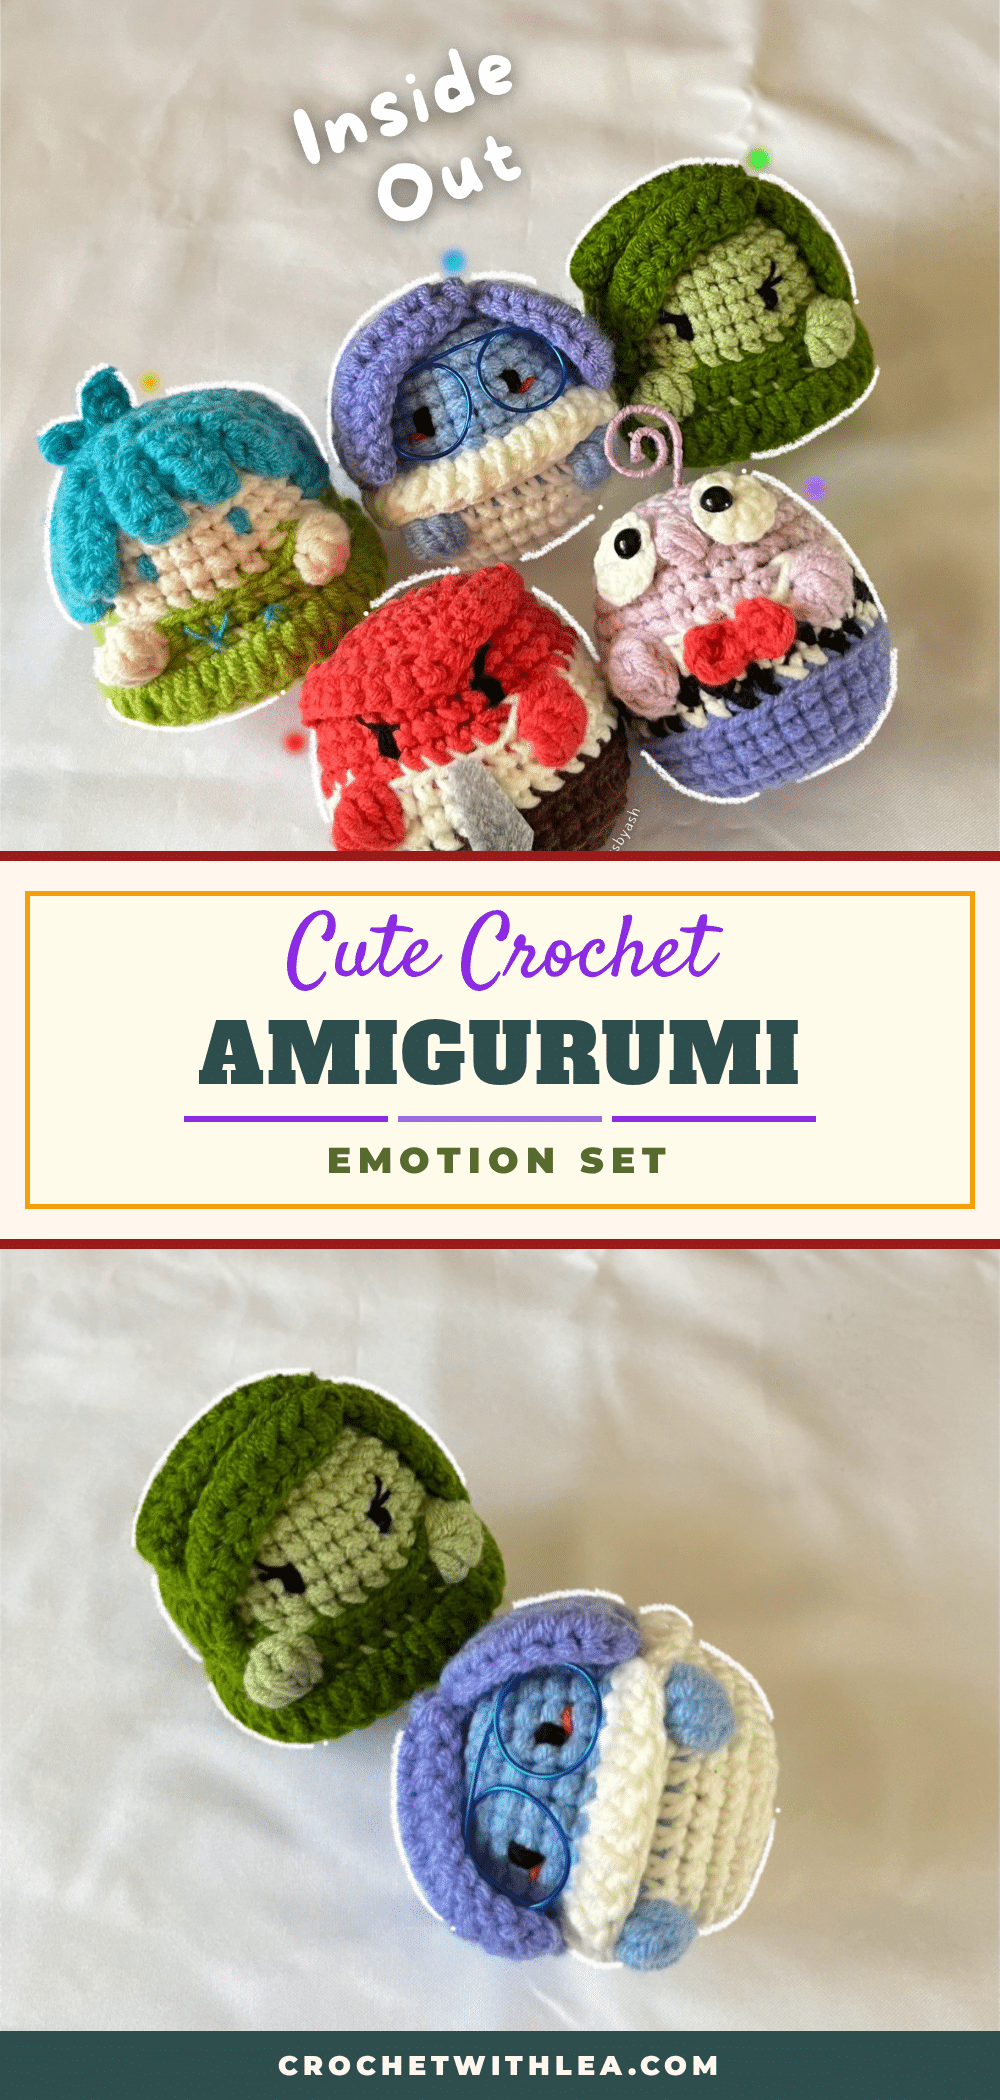
There is something deeply satisfying about pulling a specific shade from your stash to bring a character to life. For this set, the decision was simple: grab the softest cotton/acrylic sports yarn you have and let the colors do the talking. Whether it is the vibrant avocado green for Joy or the moody deep blues for Sadness, the tactile nature of the yarn makes these little emotional companions feel grounded and real. This project is a wonderful way to use up small scraps while creating a cohesive, expressive set that brings a touch of whimsy to any shelf.
Yarn and Color Notes
Choosing the right yarn is key to capturing the personality of each emotion. The pattern calls for cotton/acrylic or sports yarn (5ply), which provides a nice structure for the amigurumi while remaining soft to the touch. For Joy, the combination of skin tone and avocado green creates a cheerful, sunny vibe, while the addition of a tiny blue flower adds a delicate finishing detail. Sadness benefits from the cool contrast of white and deep blue, evoking a sense of calm melancholy. Anger pops with dark brown and red, giving it a bold, fiery presence. Fear’s gingham sweater in black and white offers a classic, slightly spooky texture, while purple hands add a unique pop of color. Using a variety of these hues allows you to tell a story with your yarn choices, making each character distinct and visually engaging.
Project Overview
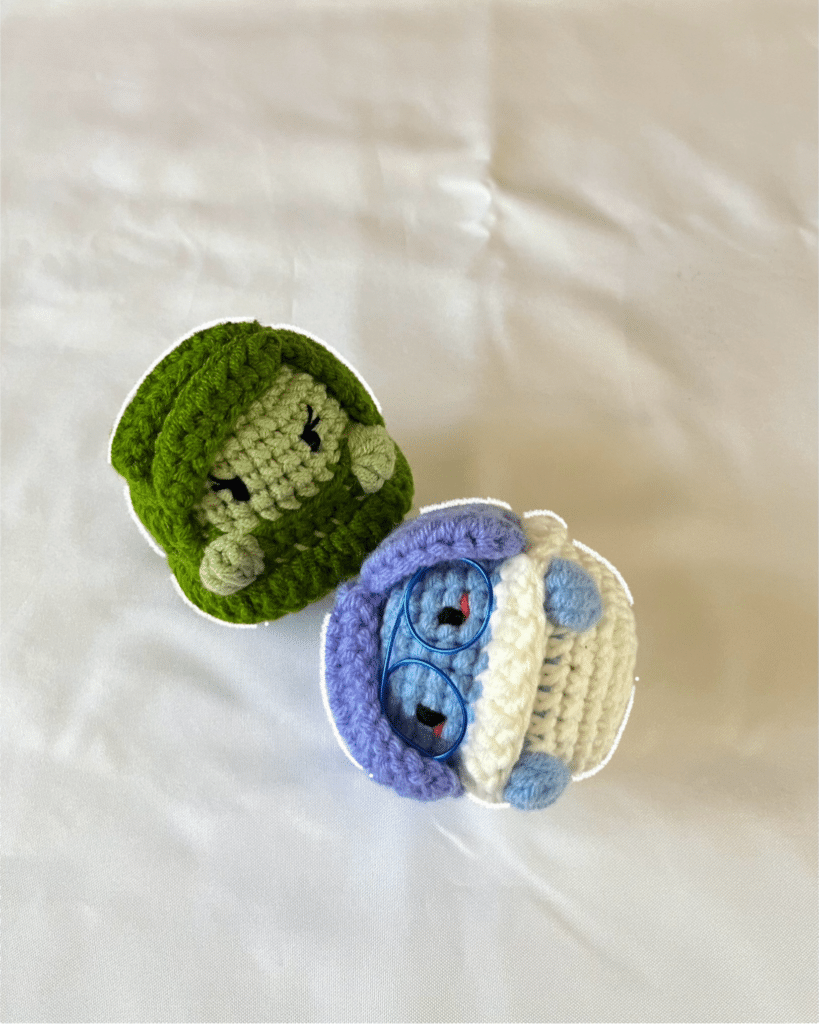
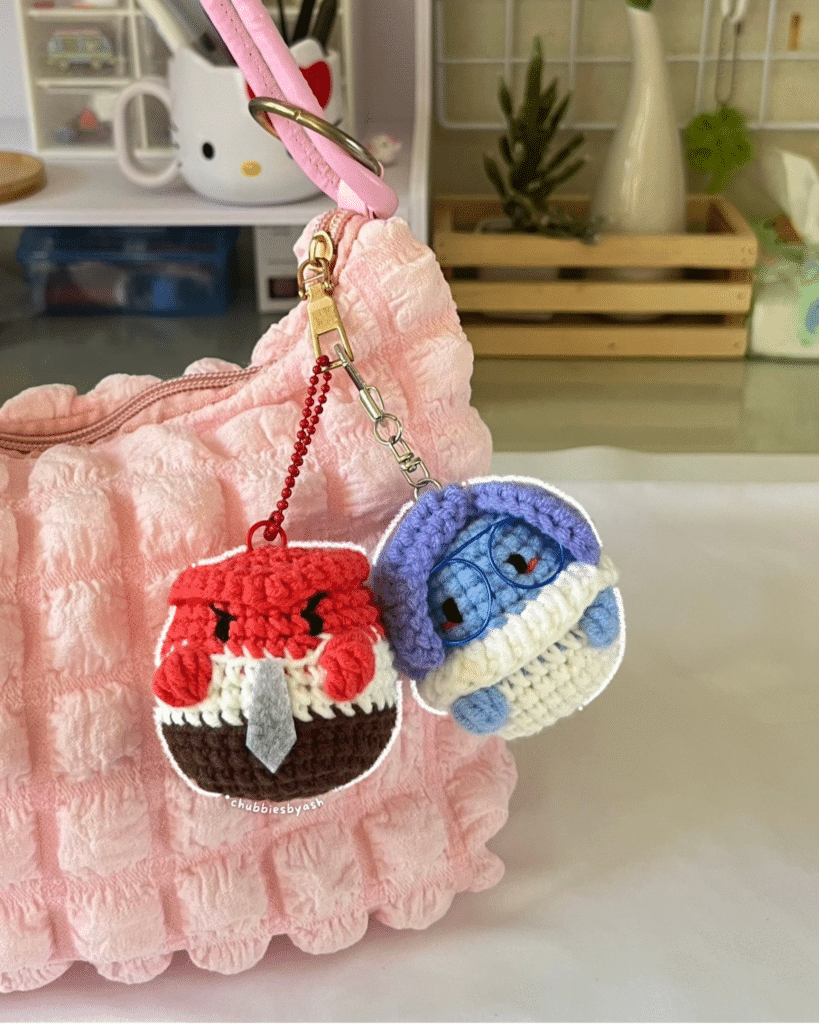
This pattern includes instructions for creating five distinct amigurumi characters representing different emotions: Joy, Sadness, Disgust, Anger, and Fear. Each character shares a similar body structure but differs in color palette, hair style, and specific details like glasses or neckties. The project involves crocheting the body, creating hair wigs with individual strands, adding facial features, and assembling the final pieces. It is a great project for crocheters looking to practice color changes, bob stitches, and hair strand techniques.
Materials
- Cotton/acrylic or sports yarn (5ply) in the following colors:
- Joy: Skin color, Green, Blue
- Disgust: Avocado Green, Dark Green
- Sadness: White, Blue, Deep Blue
- Anger: Dark Brown, White, Red
- Fear: Deep Blue, Purple, White, Black
- 3mm crochet hook
- 5mm eyes (x10 total, two per character)
- Grey felt cloth
- Craft wire (1mm thick)
- Stuffing materials
- Darning needle
- Glue
- Scissors
Gauge and Finished Size
Gauge and finished size measurements are not specified in the source pattern. Consistency in tension is recommended to ensure the characters fit together properly.
Abbreviations
Abbreviations are in US terminology.
- Ch – Chain
- mr – magic ring
- st – stitch
- R – round / row
- sc – single crochet
- inc – increase
- dec – decrease
- dc – double crochet
- hdc – half double crochet
- slst – slip stitch
- BLO – back loops only
- FLO – front loops only
- * – repeat
- Bob – Bob stitch
- S – Strands (*hair strands)
- [] – total stitch count in each round
Pattern Notes
- Joined Rounds: We use Joined rounds for all the body bases. At the end of every round, make a slip stitch (slst) into the first single crochet (sc) of that round. Begin each new round with a chain 1 (Ch 1). The first single crochet (sc) of the new round should be made in the same stitch where you just made the slip stitch (the first sc of the previous round).
- Stitch Count: The slst and Ch1 are NOT included in our total stitch count.
- Bob Stitch: Refer to the video tutorial for a detailed explanation of how to make a Bob stitch.
- Color Changes: Pay close attention to color change instructions in specific rounds to ensure the details (like hands or clothing) appear in the correct place.
Pattern Instructions
Body (Joy, Sadness, Disgust, Anger, Fear)
Note: Disgust follows the same pattern as Joy but with different colors (Avocado Green and Dark Green). Anger and Fear have slight variations in the decrease rounds and hair details.
Joy Body
Color Palette: Skin color, Green, Blue
Start with skin color yarn.
Start with a magic ring.
- R1: 8sc in mr, 1slst (into the first sc) [8]
- R2: Ch1, 8inc, 1slst (into the first sc) [16]
- R3: Ch1, (3sc, 3sc in 1st)*4, 1slst (into the first sc) [24]
- R4: Ch1, 4sc, 3sc in one stitch, (5sc, 3sc in 1st)*3, 1sc, 1slst (into the first sc) [32]
- R5-R7: Ch1, 1sc in each stitch, 1slst (into the first sc) (3 rounds) [32]
Color change will start in R8!
- R8: Green. Ch1, in BLO, (6sc, 1dec)*4, 1slst (into the first sc) [28]
- R9: Green. Ch1, 4sc, Skin 5dc Bob st, Green 6sc, Skin 5dc Bob st, Green 16sc, Skin 1slst (into the first sc) [28]. In R9, we’ll be adding little hands with a Bob st and will change to Skin color for those parts!
Change to Skin color yarn at the end of R9, and from R10 and onwards, we will only use Skin color.
- R10: Ch1, in BLO, 1sc into each stitch, 1slst (into the first sc) [28]
- R11-R14: Ch1, 1sc into each stitch, 1slst (into the first sc) (4 rounds) [28]
- R15: Ch1, (2sc, 1dec)*7, 1slst (into the first sc) [21]
- R16: Ch1, (1sc, 1dec)*7, 1slst (into the first sc) [14]
- R17: Ch1, 7dec [7]
Cut the yarn and close the hole. Start stuffing and continue stuffing after each following rounds!
Dress Detail: To make the dress part, insert the hook into the front loop of R8, bring the green yarn and make 2ch. Make 1dc into each FLO all the way until the end. Connect with a slst (into the first dc) at the end and cut the yarn. Sew a tiny little flower onto the dress by using 1 strand of blue yarn.
Sadness Body
Color Palette: White, Blue, Deep Blue
Start with white yarn.
Start with a magic ring.
- R1: 8sc in mr, 1slst (into the first sc) [8]
- R2: Ch1, 8inc, 1slst (into the first sc) [16]
- R3: Ch1, (3sc, 3sc in one stitch)*4, 1slst (into the first sc) [24]
- R4: Ch1, 4sc, 3sc in one stitch, (5sc, 3sc in one stitch)*3, 1sc, 1slst (into the first sc) [32]
- R5: Ch1, 1sc in each stitch, 1slst (into the first sc) [32]
- R6: Ch1, (6sc, 1dec)*4, 1slst (into the first sc) [28]
In R7, we’ll be adding little hands with a Bob st and will change to Blue color for those parts!
- R7: White. Ch1, 4sc, Blue 5dc Bob st, White 6sc, Blue 5dc Bob st, 16sc, 1slst [28]
- R8-R9: White. Ch1, 1sc in each stitch, 1slst (into the first sc) (2 rounds) [28]
Change to Blue yarn at the end of R9, and from R10 and onwards, we will only use Blue.
- R10: Ch1, in BLO, 1sc in each stitch, 1slst (into the first sc) [28]
- R11-R14: Ch1, 1sc in each stitch, 1slst (into the first sc) (4 rounds) [28]
- R15: Ch1, (2sc, 1dec)*7, 1slst (into the first sc) [21]
- R16: Ch1, (1sc, 1dec)*7, 1slst (into the first sc) [14]
- R17: Ch1, 7dec [7]
Cut the yarn and close the hole. Start stuffing and continue stuffing after each following rounds!
Sweater Neck Detail: To make the sweater neck, insert the hook into the front loop of R10, bring the white yarn and make 2ch. Make 1dc into each FLO all the way until the end. Connect with a slst (into the first dc) at the end and cut the yarn.
Disgust Body
Color Palette: Avocado Green, Dark Green
Follow the same pattern for the body of the Joy by replacing skin color with avocado green and green with dark green.
Anger Body
Color Palette: Dark Brown, White, Red
Start with dark brown yarn.
Start with a magic ring.
- R1: 8sc in mr, 1slst (into the first sc) [8]
- R2: Ch1, 8inc, 1slst (into the first sc) [16]
- R3: Ch1, (3sc, 3sc in 1st)*4, 1slst (into the first sc) [24]
- R4: Ch1, 4sc, 3sc in one stitch, (5sc, 3sc in 1st)*3, 1sc, 1slst (into the first sc) [32]
- R5-R7: Ch1, 1sc in each stitch, 1slst (into the first sc) (3 rounds) [32]
Color change will start in R8!
- R8: White. Ch1, in BLO, 1sc in each stitch, 1slst (into the first sc) [32]
- R9: White. Ch1, 1sc in each stitch, 1slst (into the first sc) [32]
In R10, we’ll be adding little hands with a Bob st and will change to Red color for those parts!
- R10: White. Ch1, 5sc, Red 5dc Bob st, White 6sc, Red 5dc Bob st, White 19sc, Red 1slst (into the first sc) [32]
Change to Red yarn at the end of R10, and from R11 and onwards, we will only use Red.
- R11: Ch1, in BLO, (6sc, 1dec)*4, 1slst (into the first sc) [28]
- R12-R14: Ch1, 1sc into each stitch, 1slst (into the first sc) (4 rounds) [28]
- R15: Ch1, (2sc, 1dec)*7, 1slst (into the first sc) [21]
- R16: Ch1, (1sc, 1dec)*7, 1slst (into the first sc) [14]
- R17: Ch1, 7dec [7]
Cut the yarn and close the hole. Start stuffing and continue stuffing after each following rounds!
Fear Body
Color Palette: Deep Blue, Purple, White, Black
Start with deep blue yarn.
Start with a magic ring.
- R1: 8sc in mr, 1slst (into the first sc) [8]
- R2: Ch1, 8inc, 1slst (into the first sc) [16]
- R3: Ch1, (3sc, 3sc in 1st)*4, 1slst (into the first sc) [24]
- R4: Ch1, 4sc, 3sc in one stitch, (5sc, 3sc in 1st)*3, 1sc, 1slst (into the first sc) [32]
- R5-R7: Ch1, 1sc in each stitch, 1slst (into the first sc) (3 rounds) [32]
Color change will start in R8!
In R8 & R9, Black and White colors will be used alternatively for making a gingham style for Fear’s sweater. You need to work with two yarn colors at the same time!
- R8: Black. Ch1, in BLO, (Black 2sc, White 2sc)*8, 1slst (into the first sc) [32]
- R9: White. Ch1, (White 2sc, Black 2sc)*8, White 1slst (into the first sc) [32]
In R10, we’ll be adding little hands with a Bob st and will change to Purple color for those parts!
- R10: White. Ch1, 5sc, Purple 5dc Bob st, White 6sc, Purple 5dc Bob st, White 19sc, Purple 1slst (into the first sc) [32]
Change to Purple yarn at the end of R10, and from R11 and onwards, we will only use Purple.
- R11: Ch1, in BLO, (6sc, 1dec)*4, 1slst (into the first sc) [28]
- R12-R13: Ch1, 1sc in each stitch, 1slst (into the first sc) (2 rounds) [28]
- R14: Ch1, 8sc, 3hdc cluster stitch, 19sc, 1slst (into the first sc) [28]
- R15: Ch1, (2sc, 1dec)*7, 1slst (into the first sc) [21]
- R16: Ch1, (1sc, 1dec)*7, 1slst (into the first sc) [14]
- R17: Ch1, 7dec [7]
Cut the yarn and close the hole. Start stuffing and continue stuffing after each following rounds!
Spiral Detail: Wrap the deep blue yarn around 1mm craft wire, using the glue, until the length becomes 3-4 inches. Make a spiral shape using the crochet hook. Insert it into the center of Fear’s Head and adjust the length accordingly.
Hair Wig (Joy)
Color: Blue
Start with blue yarn.
Start with a magic ring.
- R1: 7sc in mr [7]
- R2: 7inc [14]
- R3: (1sc, 1inc)*7 [21]
- R4: Ch1, turn, (2sc, 1inc)*5 [20]
- R5: Ch1, turn, 1sc in each stitch [20]
- R6: Ch1, turn, 1inc, 18sc, 1inc [22]
- R7: Ch1, turn, 1sc in each stitch [22]
- R8: Ch1, turn, 1inc, 20sc, 1inc [24]
Cut the yarn, leaving a tail about 12 inches. Continue making the hair strands.
Strands: Insert the hook into the rightmost st of R4.
- S1: Ch6, 1sc (into the 2nd chain from the hook), 4hdc, 1slst (into the first sc) [5]
- S2-S3: Ch5, 1sc (into the 2nd chain from the hook), 3hdc, 1slst (into the next sc) (2 strands) [4]
- S4: Ch6, 1sc (into the 2nd chain from the hook), 4hdc, 1slst (into the next sc) [5]
Cut the yarn, leaving a long tail. Attach hair wig to the head. Start by pinning the wig on the head to secure it. Using a darning needle, sew the end of the hair to the head, stitch by stitch. Bring other yarn ends into the same stitch hole, tie altogether, and cut the yarn. Glue the roots of hair strands the way you want them.
Top Hair: Do tiny little hair on top of the head. Insert the hook into the place near the center of the head and bring the blue yarn. S1-S2: Ch3, 1sc (into the 2nd ch from the hook), 1hdc, 1slst (into the next st) (2 strands) [2]. Cut the yarn and weave in the ends.
Hair Wig (Sadness)
Color: Deep Blue
Start with deep blue yarn.
Start with a magic ring.
- R1: 7sc in mr [7]
- R2: 7inc [14]
- R3: (1sc, 1inc)*7 [21]
- R4: Ch1, turn, (2sc, 1inc)*5 [20]
- R5: Ch1, turn, 1sc in each stitch [20]
- R6: Ch1, turn, 1inc, 18sc, 1inc [22]
- R7: Ch1, turn, 1sc in each stitch [22]
- R8: Ch1, turn, 1inc, 20sc, 1inc [24]
- R9: Ch1, turn, 1sc in each stitch [24]
Cut the yarn, leaving a tail about 12 inches. Continue making the hair strands.
Strands: Insert the hook into the rightmost st of R4.
- S1: Ch9, 1sc (into the 2nd chain from the hook), 7hdc, 1slst (into the first sc) [8]
- S2: Ch11, 1sc (into the 2nd chain from the hook), 9hdc, 1slst (into the second sc) [10]
Cut the yarn, leaving a long tail. Attach hair wig to the head. Start by pinning the wig on the head to secure it. Using a darning needle, sew the end of the hair to the head, stitch by stitch. Bring other yarn ends into the same stitch hole, tie altogether, and cut the yarn. Glue the roots of hair strands the way you want them.
Eyes
Use 5mm eyes or embroider. For embroidered eyes (Joy example): Cut the blue yarn about 8 inches and separate it to get 3 strands (You can use black yarn if you want). At the 3rd round above the color change with 4 stitches between the eyes, embroider the eyes of 1 stitch height using darning needle.
Additional Details
- Anger: Crochet the red eyebrow for Anger.
- Anger: Add a Necktie.
- Disgust: Add Glasses.
- Joy: Add a Mini Bow.
Assembly
1. Stuff the bodies firmly, continuing to stuff after each round from R15 onwards.
2. Close the holes at the top of the heads using a darning needle.
3. Attach the hair wigs to the heads by pinning them in place and sewing the ends securely. Glue the roots for a neat finish.
4. Attach the eyes (5mm safety eyes or embroidered) according to the character instructions.
5. Add any additional details such as eyebrows, neckties, glasses, or bows.
6. For Fear, insert the spiral shape made from wrapped craft wire into the center of the head.
Tips
- Watch the accompanying video tutorials for detailed demonstrations of the Bob stitch, color changes, hair strand creation, and closing the amigurumi hole.
- Use a stitch marker to keep track of the beginning of each round, especially when working with joined rounds.
- When working with two yarn colors for Fear’s gingham sweater, manage the yarn tails carefully to avoid tangling.
- Glue can be used to secure hair roots and small details for a cleaner finish.
FAQs
What type of yarn is best for this pattern?
The pattern recommends cotton/acrylic or sports yarn (5ply). This type of yarn provides good stitch definition and structure, which is helpful for the detailed features of these characters.
How do I make a Bob stitch?
A Bob stitch is a textured stitch that creates a small, raised bump. Refer to the video tutorial linked in the pattern for a step-by-step visual guide on how to execute this stitch correctly.
Can I use a different hook size?
The pattern specifies a 3mm crochet hook. Using a different hook size may alter the gauge and the final size of the amigurumi, so it is recommended to stick with the specified size for the best results.
How do I attach the hair wigs securely?
Pin the wig to the head to position it correctly, then use a darning needle to sew the ends of the hair strands into the head. You can also use glue to secure the roots for a neat and durable finish.
Is this pattern suitable for beginners?
This pattern involves multiple characters, color changes, and specific techniques like Bob stitches and hair strands. It is best suited for crocheters with some experience who are comfortable following detailed instructions and watching video tutorials.
Pin This Crochet Pattern!