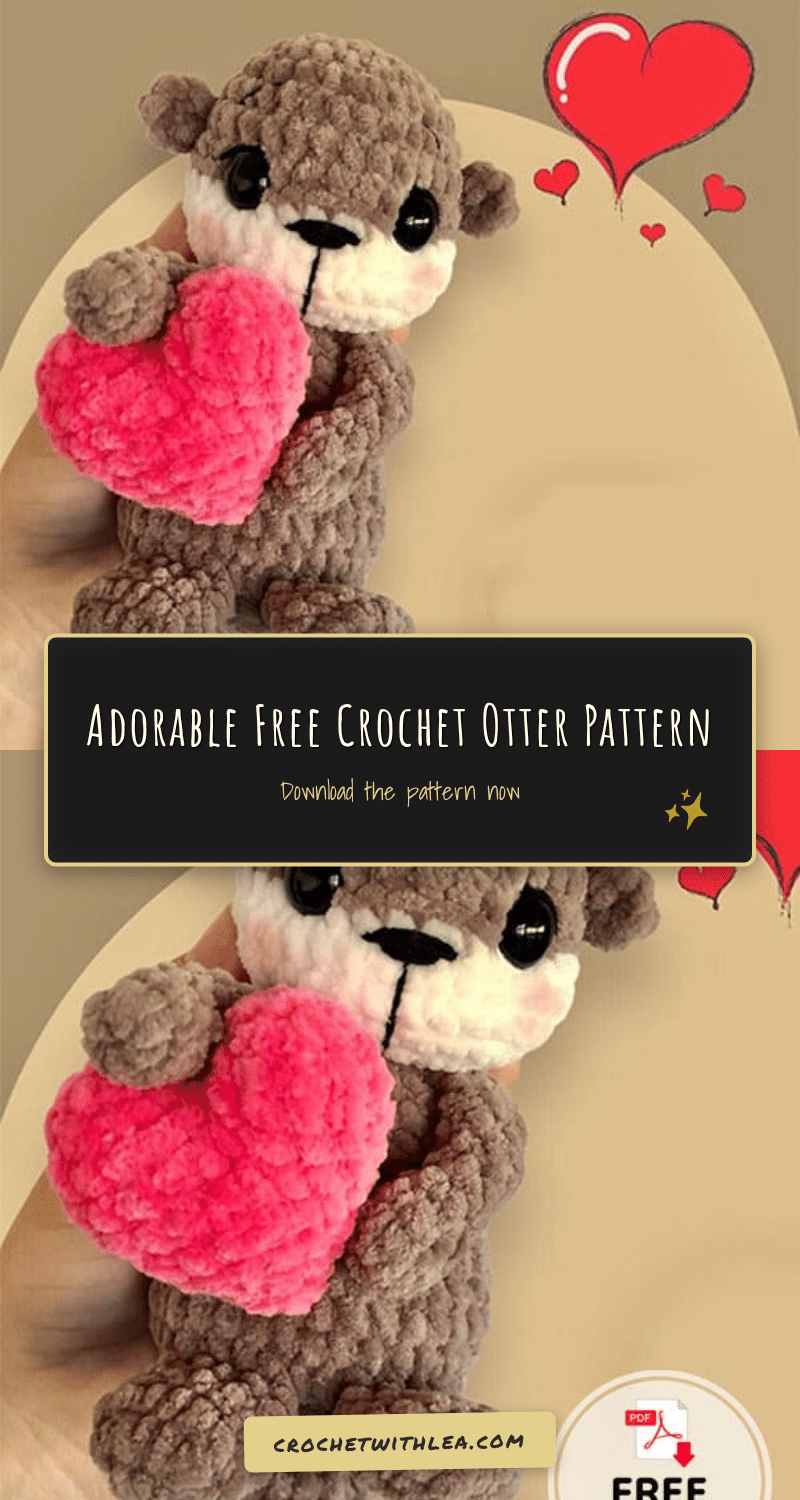
Looking for a charming handmade gift that combines cuteness with a sweet message? This adorable free crochet otter pattern is the perfect project for that. Ollie the otter holds a delicate pink heart, making him an ideal companion for Valentine’s Day, anniversaries, or simply as a comforting plush toy for a child. Whether you are crafting for a market stall or a personal keepsake, this amigurumi design offers a delightful mix of textures and assembly techniques that will keep you engaged from the first magic ring to the final stitch.
Gift and Use Ideas
While Ollie is undeniably cute on his own, the inclusion of the heart transforms him into a symbol of affection. He works beautifully as a nursery decoration, adding a touch of nature-inspired softness to a baby’s room. Because he is constructed with plush yarn, he is durable enough for cuddling but small enough to fit into a gift box. You can also use him as a unique “just because” gift for friends who love marine life or amigurumi collectors. The heart he holds can even be swapped for different colors depending on the occasion, though the classic pink creates a lovely contrast against the brown and white otter.
Project Overview
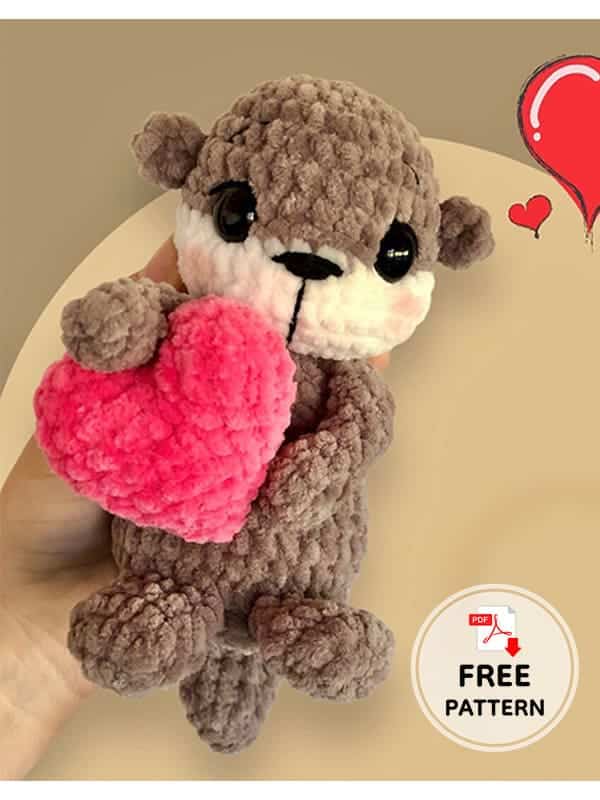
This pattern guides you through creating Ollie, a plush otter holding a heart. The project involves multiple components: a head, body, two legs, two arms, a tail, two ears, and a heart. The pattern utilizes standard amigurumi techniques, including working in the round, increasing and decreasing, and joining parts together as you go. The otter features a brown body with a white belly patch on the head, and the heart is crocheted in pink. Face sculpting is achieved through embroidery rather than additional crochet pieces.
Materials
- Yarn: Plush yarn (The source used Yarn Art Dolce). You will need brown and white for the otter, pink for the heart, and small amounts of black and white cotton yarn for facial details.
- Hook: 3.5 mm crochet hook (or a size appropriate for your yarn).
- Notions:
- 12 mm safety eyes
- Stitch marker
- Scissors
- Tapestry needle
- Fiber filling (stuffing)
Gauge and Finished Size
Specific gauge measurements and finished dimensions are not provided in the source pattern. It is recommended to use the suggested 3.5 mm hook and plush yarn to achieve the intended plush texture. If you substitute yarn, your finished size may vary.
Abbreviations
- MR: Magic ring
- st/sts: Stitch/stitches
- sc: Single crochet
- inc: Increase
- dec: Decrease
- BLO: Back loop only
- FLO: Front loop only
- slst: Slip stitch
Pattern Notes
This pattern is designed to be worked in continuous rounds unless otherwise stated. Always remember to move your stitch marker up at the end of each round. The otter is stuffed as you progress through the rounds to maintain shape. For the face, the pattern relies on embroidery to create eyelids, eyebrows, and the nose, giving the otter a distinct expression.
Pattern Instructions
Head
Start with brown color. Stuff as you go.
- Rnd 1: 6 sc in MR
- Rnd 2: 6 inc (12)
- Rnd 3: (1sc, inc)*6 (18)
- Rnd 4: (2sc, inc)*6 (24)
- Rnd 5: (3sc, inc)*6 (30)
- Rnd 6-8: 30 sc (3 rnds)
- Change the color to white.
- Rnd 9: (4 sc, inc)*2, (4sc, inc)*2 on BLO, (4sc, inc)*2 (36)
- Rnd 10: 36 sc. Insert the safety eyes between rounds 8 and 9, distance between 5 visible stitches.
- Rnd 11: (4sc, dec)*6 (30)
- Rnd 12: (3sc, dec)*6 (24)
- Rnd 13: (2sc, dec)*6 (18)
- Rnd 14: (1sc, dec)*6 (12)
- Rnd 15: 6 dec
Sew the hole closed. Fasten off and weave in the ends.
Ears (Make Two)
Crochet with brown color.
- 5 sc in MR, slst.
Fasten off and leave a tail for sewing. Sew the ears on round 7 of the head, 3 sc back from both eyes.
Tighten and Face Sculpting
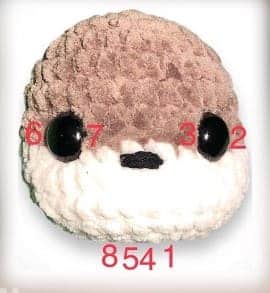
Follow the numbers from the pictures provided in the original source. Tighten each end of the thread well and then tighten both ends at once. Embroider eyelids, eyebrows, and nose using black and white cotton yarn.
Legs (Make Two)
Crochet with brown color. Stuff as you go lightly until round 2.
- Rnd 1: 7 sc in MR
- Rnd 2: 7 inc (14)
- Rnd 3: 14 sc
- Rnd 4: 7 dec (7)
Fold the leg and crochet 4 sc through both layers. Fasten off and weave in the ends.
Arms (Make Two)
Crochet with brown color. Stuff as you go lightly until round 4.
- Rnd 1: 7 sc in MR
- Rnd 2-3: 7 sc (2 rnds)
- Rnd 4: dec, 5 sc (6)
- Rnd 5-8: 6 sc (4 rnds)
Fold the arm and crochet 3 sc through both layers. Fasten off and weave in the ends.
Tail
Crochet with brown color. Do not stuff.
- Rnd 1: 6 sc in MR
- Rnd 2: (1sc, inc)*3 (9)
- Rnd 3: (2sc, inc)*3 (12)
- Rnd 4: 12 sc
- Rnd 5: (3sc, inc)*3 (15)
- Rnd 6: 15 sc
- Rnd 7: (4sc, inc)*3 (18)
- Rnd 8-9: 18 sc (2 rnds)
Fold the tail and crochet 9 sc through both layers. Fasten off and weave in the ends.
Body
Crochet with brown color. Stuff as you go.
- Rnd 1: 6 sc in MR
- Rnd 2: 6 inc (12)
- Rnd 3: (1sc, inc)*6 (18)
- Rnd 4: (2sc, inc)*6 (24)
- Rnd 5: (3sc, inc)*6 (30)
- Rnd 6: (4sc, inc)*6 (36)
In the next round connect the legs and tail:
- Rnd 7: 8 sc, 4 sc with the left leg, 2 sc, 4 sc with the right leg, 9 sc, 9 sc with tail (36)
- Rnd 8-9: 36 sc (2 rnds)
- Rnd 10: (4sc, dec)*6 (30)
- Rnd 11: 30 sc
- Rnd 12: (3sc, dec)*6 (24)
- Rnd 13-14: 24 sc (2 rnds)
- Rnd 15: (2sc, dec)*6 (18)
In the next round connect the arms:
- Rnd 16: 2 sc, 3 sc with the left arm, 5 sc, 3 sc with the right arm, 5 sc (18)
- Rnd 17: (1sc, dec)*6 (12)
Fasten off and leave a tail for sewing the body with the head.
Heart
Crochet with pink color. Stuff as you go.
First bump:
- Rnd 1: 6 sc in MR
- Rnd 2: 6 inc (12)
- Rnd 3: 12 sc
Fasten off and leave a tail for sewing the gap between the bumps.
Second bump: Repeat the first bump, don’t fasten off.
- Rnd 4: Connect the bumps with sc, crochet 11 sc around the bump, 12 sc around the other bump (24)
- Rnd 5: 24 sc
- Rnd 6: (2sc, dec)*6 (18)
- Rnd 7: 18 sc
- Rnd 8: (1sc, dec)*6 (12)
- Rnd 9: 12 sc
- Rnd 10: 6 dec
Sew the hole closed. Fasten off and weave in the ends. Sew the heart to the hands.
Assembly
- Attach Ears: Sew the ears to the head on round 7, positioned 3 sc back from both eyes.
- Face Sculpting: Embroider the eyelids, eyebrows, and nose using black and white cotton yarn. Ensure threads are tightened well for definition.
- Attach Legs: The legs are integrated into the body during Round 7. Ensure they are positioned symmetrically.
- Attach Tail: The tail is integrated into the body during Round 7, following the right leg.
- Attach Arms: The arms are integrated into the body during Round 16. Position them so the otter can hold the heart.
- Join Head to Body: Use the tail left from the body to sew the head to the top of the body.
- Attach Heart: Sew the pink heart between the otter’s hands.
Tips
- Stuffing: Stuff the head and body as you go to maintain a firm, round shape. For the legs and arms, stuff lightly until the specified rounds before folding and joining.
- Face Details: When embroidering the face, pull the threads tight to create the “sculpted” look of the eyelids and nose.
- Yarn Choice: Using plush yarn like Yarn Art Dolce will give the otter a soft, fuzzy finish that hides stitch definition, enhancing the cute aesthetic.
FAQs
What hook size should I use?
The pattern recommends a 3.5 mm hook, but you should adjust this to match your yarn weight. If your stitches look too loose, use a smaller hook; if they are too tight to work into, use a larger hook.
How do I attach the legs and tail to the body?
The pattern instructs you to crochet directly into the legs and tail during Round 7 of the body. You will work single crochet stitches through the loops of the leg and tail pieces to join them seamlessly to the body.
Can I use safety nose instead of embroidery?
The source pattern specifies embroidery for the nose and eyes. If you prefer a safety nose, you can insert it during Round 10 along with the eyes, but you will need to adjust the embroidery instructions accordingly.
Why do I need to fold the legs and arms?
Folding the legs and arms allows them to be attached flat to the body, creating a stable stance for the otter to sit or stand. It also gives the limbs a more realistic, jointed appearance.
Is this pattern suitable for beginners?
This pattern is best for crocheters with basic amigurumi experience, as it involves joining multiple parts and integrating limbs into the body rounds. However, the instructions are detailed and the stitches are standard single crochet.
Pin This Crochet Pattern!